Setting up your OCaml development environment #
This document should help you get up and running with an OCaml development environment on your computer. We assume you have a Unix-like operating system available, such as MacOS or Linux. (For Windows users, we’ll provide instructions on setting up Linux in a virtual machine.)
Background on the Unix command line #
Regardless of the operating system of your computer, you’ll be interacting with it using the Unix operating system’s command line.
Unix is a family of operating systems, originally developed at
Bell Labs in the 1970s by Ken Thompson and Dennis Ritchie. Operating
systems have many newer user interface features, but some of the
original features from Unix will be the most useful in CS 51.
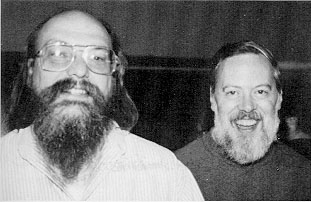
Ken Thompson and Dennis Ritchie
Ken Thompson (left; 1943–) and Dennis Ritchie (1941–2011), co-developers (with several others) of the Unix operating system, which underlies the design of many of the current operating systems in use today. They were awarded the Turing Award in 1983 for their work on Unix.
Users of the earliest Unix systems interacted with their
computers exclusively through the keyboard, via the command
line. They would type commands (names of short programs) that
directed the computer to take action, like running a program to switch
to a different folder in the file system or to create or delete a text
file.
If you took CS 50, you ran commands in the command line on the CS 50 IDE. While you may never have done so before, you can also interact with your Mac, Linux, or Windows machine via the command line. You will spend a good deal of time at the command line in CS 51, and comfort at the command line, developed over time, will be one of the skills you build in this course.
As it turns out, macOS and Linux are both built on versions of Unix. On Windows, alternative command line facilities can be used. This common substrate for interacting with the computer makes it possible to work similarly for this course on the various operating systems.
Accessing the Unix command line #
On macOS
On macOS
macOS comes with a Unix command line application called
Terminal. You can find this application by searching for Terminal in
Spotlight or looking in the Applications > Utilities
folder. Once launched, the application provides a ‘‘terminal window’’
with a command line prompt at which you can enter commands.
On Windows
On Windows
Because Windows is not a Unix-based operating system, we recommend installing an Ubuntu Linux virtual machine (VM) to get access to a Unix command line. (The following installation instructions are adapted from CS 61’s infrastructure page.)
We recommend that you use the latest LTS release, Ubuntu 20.04.1 LTS (Focal Fossa). You can download it from Ubuntu here. Note that Ubuntu is free and you don’t need to make a donation.
To run the VM, you will need to install a virtual machine monitor. We recommend using VMware. To get VMware (free), fill out this Google form with your name, e-mail, HUID, etc., requesting VMware Workstation 15. You will receive an account at the Software Center once your request is approved. Its user name and initial email address will both be your Harvard email address. Note: VMware Online Store account requests are manually approved, and it may take up to a day to receive a response. Do not wait until the last minute to claim your VMware store account.
When your request is approved and you receive an account information email from the VMware WebStore, open the WebStore link in the email and continue setting up your Ubuntu VM:
- The VMware Software Center is set up like a store. On the store front page, click on VMware Workstation 15.
- In the drop-down menu labeled ‘Choose a platform’, make sure that Windows is selected. Click the ‘Add to Cart’ button, then proceed through the check-out process until you reach a screen with a ‘Start Download’ button. Click the ‘Start Download’ button to download the installer for Workstation 15.
- On the store front page, click on ‘Your Account/Orders’ under the ‘Hello, [user]’ menu. Click on ‘View Details’ to see your product key.
- Click on the file you downloaded and launch VMware Workstation’s installer. If you are asked whether to allow the installer to make changes to your computer, enter your password, and click ‘Yes’.
- A window entitled ‘Welcome to the VMware Workstation Pro Setup Wizard’ should appear. Click ‘Next’.
- When prompted with a license agreement, select ‘I accept the terms in the license agreement’, then click ‘Next’.
- You’ll next come to a ‘Custom Setup’ window. You need not change the ‘Install Location’. Leave the ‘Enhanced Keyboard Driver’ option unchecked, and then click ‘Next’.
- On the next screen, ‘User Experience Settings’, uncheck the ‘Help improve VMware Workstation Pro’ box and click ‘Next’.
- When prompted about ‘Shortcuts’, leave both boxes checked and click ‘Next’.
- You’ll now come to the ‘Ready to install VMware Workstation Pro’ screen; select ‘Install’. It will take a minute or two for the installation.
- When you come to the ‘Completed the VMware Workstation Pro Setup Wizard’ screen, click on ‘License’, and paste the license key that you got from the VMware store. Then click ‘Finish’.
You are now ready to create a new Ubuntu VM in VMware Workstation:
- Launch VMware Workstation.
- Go to Edit -> Preferences, then open the ‘Display’ tab and check the box next to the ‘Autofit guest’ option. With this enabled you can resize the VMware Workstation window to resize your virtual machine’s screen.
- Go to File -> New Virtual Machine to create a new virtual machine.
- Select the ‘Typical’ option. Click ‘Next’.
- Select the ‘Installer disc image file’ option, then click ‘Browse’
and open the Ubuntu disc image you downloaded earlier (it will likely be
named
ubuntu-20.04.1-desktop-amd64.iso). Click ‘Next’. - Enter a user name and password. Click
Next. - If you want to, change the ‘Virtual machine name’ field. Click ‘Next’.
- Set the ‘Maximum disk size’ to
20.0and select the ‘Split virtual disk into multiple files’ option. Click ‘Next’. - Make sure the ‘Power on this virtual machine after creation’ option is checked, then click ‘Finish’ to power on the VM and start the Ubuntu installation. The Ubuntu installer may appear to freeze on a black screen occasionally, this is normal and the installation should complete within a few minutes.
- After the installation completes, you will be prompted to log into your Ubuntu system user account. Log in with the password you entered during the VM setup.
- You should be prompted with a ‘What’s new in Ubuntu’ screen. Click Next through it, selecting ‘No, don’t send system info’ when prompted to ‘Help improve Ubuntu’.
Your Ubuntu VM is now ready to use. From here on, continue to the next section and follow the Linux-specific instructions from within your new Ubuntu VM.
On Linux
On Linux
The standard command line program on Linux systems is bash.
In Ubuntu, you can find it by right-clicking on the desktop and selecting
the Open Terminal option. If you’re a Linux user running a
different distribution, you already know how to access it.
Interacting with the Unix command line #
Interacting with the command line starts at the command line prompt,
which is typically a % or $ though it may
include much other information. We will use the % symbol to
represent the Unix command line prompt in our examples. (You should
not type that symbol itself at the prompt.)
Let’s investigate some programs that are useful for interacting at the command line. (If you are already familiar with Unix, feel free to skip this section.)
-
man– Themancommand (short for ‘manual’) provides documentation on other commands. Try typing% man mkdirType
qto exit the manual page reader. -
mkdir– Themkdircommand (short for ‘make directory’) makes a new directory (or in macOS parlance, folder) in the current directory that you are currently accessing. Try typing% mkdir testdirectory -
ls– Thelscommand (short for ‘list directory’) lists the contents of the current directory. Try typing% lsIt should show the files and subdirectories of your main (‘‘root’') directory, including the
testdirectorydirectory that you just made. -
cd– Thecdcommand (short for ‘change directory’) changes the current directory. Its argument specifies the directory to move to. You can give a subdirectory of the current directory to change to that subdirectory, or ‘'..’’ to change to the immediately enclosing directory. Try typing% cd testdirectory% lsIt should move you to the
testdirectoryyou just made, and list its contents. (There shouldn’t be anything there.) Now% cd ..to move back to the root directory.
-
rm– Thermcommand (short for ‘remove file’) deletes a file. Its argument specifies the file or files to be deleted. Be careful with this one.
We call these ‘‘commands’’, but they are actually programs. Thinking
of them as programs will be helpful when you start to install new ones,
and you should be aware that these programs can be run with many
different interesting and powerful options. (Take a look at
man ls. Type q to exit the manual page reader.)
For more guidance on the command line, check out this link.
Package managers #
Now that you know what the command line is and how to move around, it’s time to start installing software. Your development environment for the course will include the OCaml programming tools (compiler, interpreter, build system, package manager); the git version control system; and a text editor for editing software.
To install all of these things, you could search for instructions on
the web and download .zip files. This is how you may have
installed software in the past. Since we’re going to be building our
own software, however, we care a great deal about keeping careful
track of what software we have installed. As such, we’re going to use
a package manager.
On macOS
On macOS
We recommend using Homebrew as the package
manager on macOS, though there are alternatives. You’ll install it as
brew at the command line.
Head to http://brew.sh in a web browser and follow the
directions there to install the brew command line tool. The
standard installation should work.
To double check, type following command.
% brew
You should see a help menu printed. (Throughout the course, the
% symbol represents the Unix command line prompt, and
indicates commands that should be typed at the Unix command line. You
should not type the prompt symbol.)
On Linux
On Linux
There are several package managers available for Linux systems, but if
you’re running Ubuntu, we recommend
apt-get.
Your Linux distribution should come with apt-get
pre-installed. To make sure, type
% sudo apt-get
You should see a help menu printed.
Installing software #
Now that you have a package manager, you can install the other software that you will need.
First, update Homebrew’s listing of available packages. Throughout the semester, certain labs and problem sets have you build
a program that has a graphical user interface (GUI, pronounced
goo-ey). OCaml uses the
X system to display
graphics windows with interactive elements, but Apple doesn’t install
X on Mac OS by default. To install it yourself, run: You must now install At this point, close anything you are working on and restart
your computer. First, update Linux’s index of available packages to make sure that
everything you need can be found. The If you are using an Ubuntu VM on VMWare, you should also run the
following command and restart your VM. These packages will help
optimize Ubuntu for VMWare Workstation. Finally, run the following command to install On macOS
On macOS
% brew update
% brew install xquartz
opam. opam is the package manager
for OCaml itself, and you will use it to manage our OCaml
installation. opam allows you to install multiple OCaml
versions simultaneously.% brew install pkg-config
% brew install gpatch
% brew install opam
On Linux
On Linux
% sudo apt-get update -y
git program and several other
useful tools need to be installed on Linux. You can do so with:% sudo apt-get install -y gcc make patch unzip m4 git xorg libx11-dev pkg-config
% sudo apt-get install -y open-vm-tools open-vm-tools-desktop
opam,
the OCaml package manager.% sudo apt-get install -y opam
Installing the OCaml tools #
You may be asking yourself why we installed a package manager
specifically for OCaml after installing a general package manager
for your system.
This is a reasonable question, and luckily it also has a reasonable answer. A software project is often developed by many different people, each of whom may be running a different operating system. Many software projects also take advantage of external libraries that have been made available to other developers. Sharing previously written libraries and packages for specific programming languages across multiple operating system package managers (note that there are 4 different version of this document), and keeping all of the different listings in sync with each other, would be a true challenge of coordination. This complexity arises before considering the fact that several different projects that one developer is working on may each require a different version of the same programming language.
To solve this problem, the developer communities for most popular programming languages have built abstractions between the libraries for and versions of their language and the operating system in the form of language-specific package managers. Each system’s version of a language-specific package manager knows how to install libraries on that system, so that the authors of a library need only describe how the single manager should install the library. Package managers for particular languages thus serve as an abstraction mechanism over the various operating systems they support.
Setting up OPAM #
OPAM is the package manager for OCaml; you installed it
above. Some other examples of language-specific package managers are
pip for Python, npm for Node.js, and gem for Ruby.
To set up OPAM, run:
% opam init -a
At this point, close your terminal window and open a new one.
The official version of OCaml used in CS 51 this year is 4.12.0.
This may not be the version installed by default by the system package
manager. In addition to managing OCaml packages, OPAM can also
manage OCaml versions. To install the correct version, run:
% opam update
% opam switch create 4.12.0
% opam switch 4.12.0
Now that you have the right version, you can install some packages that you will need during the course.
% opam install -y graphics
% opam install -y ocamlbuild
% opam install -y ocamlfind
% opam install -y ocamlnet
% opam install -y yojson
% opam install -y merlin
% opam install -y utop
% opam install -y menhir
We also have created a special package for CS51 called CS51Utils.
Feel free to peruse the CS51Utils package on Github. This is how
OCaml distributes third party packages, similar to the ones you
installed above. This package contains some useful functions that you
can use across the problem sets and labs in the course. You will be
introduced to these functions during the labs.
% opam pin add CS51Utils https://github.com/cs51/utils.git -y
After all of this is done, you should finish the process by running the following command, which should have no output:
% eval $(opam env)
At this point, close anything you are working on and restart your computer.
Verifying that OCaml graphics is working #
Next, we want to check whether OCaml graphics is properly installed on
your computer. To verify that graphics is properly working on your
computer, we’ve included a graphics verification tool in CS51Utils.
(Thanks to CIS120 at UPenn for help with the following instructions.)
Run the following shell comand.
% cs51-graphics-check
The XQuartz implementation of the X11 window system should run, and a small window with a white exclamation mark on a red background should appear, as in the figure below.

An OCaml graphics window
This window should appear if graphics is properly set up.
If so, OCaml graphics is properly installed and you’re all set. If not, proceed with the remaining instructions.
If the graphics window does not work on macOS
(These instructions are for macOS only. If you are having issues on Windows or Linux, please reach out to a TF.)
Verify that the X11 libraries exist by running the following command:
% find /opt -name libX11.6.dylib
The file should be found at /opt/X11/lib/libX11.6.dylib.
If not, you’ll need to reinstall XQuartz. Run the following command.
% brew install xquartz
Then restart your computer and retry the find command.
Retry the cs51-graphics-check command.
If things still aren’t working, reinstall the OCaml graphics package.
% opam uninstall graphics
% opam install graphics
Save any open files and restart your computer.
Retry the cs51-graphics-check command.
If things still aren’t working, try manually linking the X libraries:
% cd
% mkdir lib
% cd lib
% ln -s /opt/X11/lib/libX11.6.dylib libX11.6.dylib
Save any open files and restart your computer.
If you continue to have issues, please stop by Office Hours or reach out to a TF for further assistance.
The OCaml REPL #
Now that you have OCaml installed, to verify that everything went well, open your system’s Terminal and type:
% ocaml
You should see the following:
% ocaml
        OCaml version 4.12.0

#
This is the OCaml read-eval-print loop (REPL), where you can type
or paste OCaml code and see the output evaluated. To quit the
REPL, press ctrl + D or type #quit;; to call the
REPL’s quit command.
utop #
You also installed a more-fully featured OCaml REPL, called
utop. It has useful features like auto-completion built-in.
To make sure that it is working, type:
% utop
It should also identify 4.12.0 as the version of OCaml
it is running. It can be quit in the same way as the ocaml REPL.
Then verify that typing the string "are we there yet?"
(including quotes) followed by two semicolons and pressing enter
results in something like this:
# "are we there yet?" ;;
- : string = "are we there yet?"
(The # character represents the OCaml prompt; you don’t need to type it.)
Congratulations! You just ran your first OCaml code!